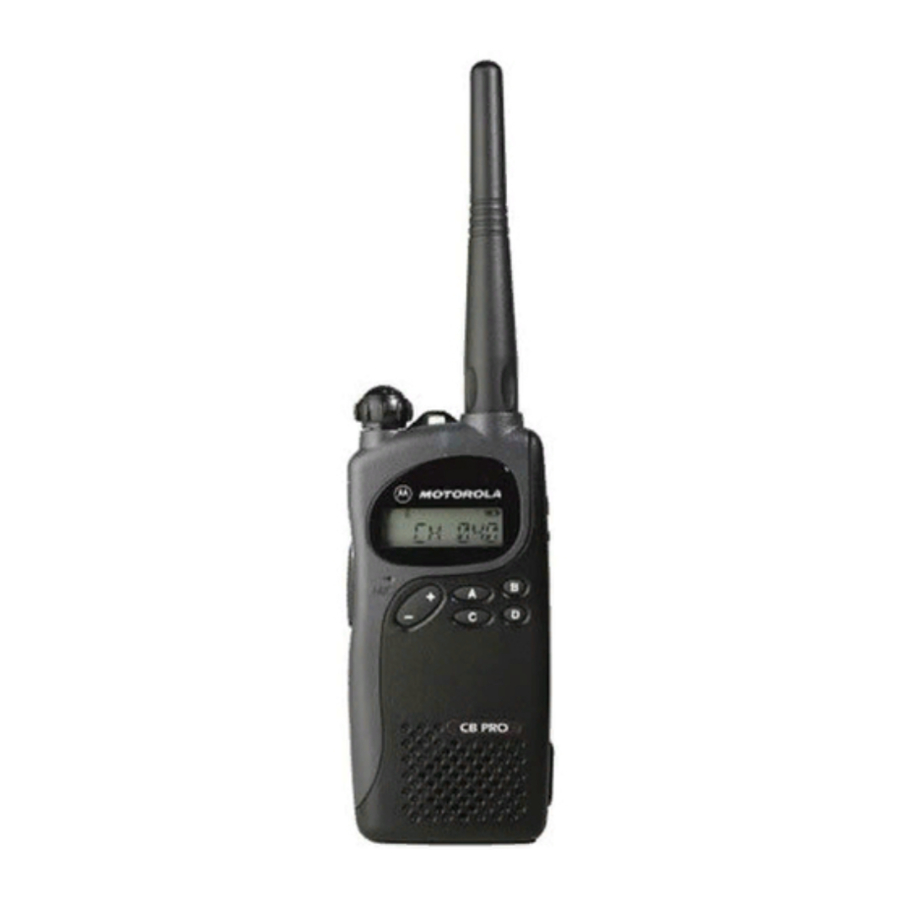
The Motorola CB PRO operates on the Citizen Band Radio Service (CBRS) UHF frequencies. It requires no service fees or licenses, and can be used by anybody in Australia or New Zealand.
The CB PRO supports 40 channels. Channels 5 and 35 are designated for emergency communications ONLY, and non-urgent communications must be confined to the other channels. Channels 22 and 23 are receive only channels; thus, no voice transmissions are allowed on these channels.
Channels 1 to 8 designated as repeater output channels; Channels 31 to 38 are the corresponding designated repeater input channels. Channel 1 to 8 can be activated at a press of a button to operate in Talkaround mode (point to point, single frequency communications) when not used in the locality of repeaters.
Before you start using your radio, please make sure to do the following.
NOTE: If a particular channel receives many unwanted calls coming from radios that do not belong to your communications group and are some distance away, or the "background noise" is excessive, you can try to filter out these transmissions by tightening the channel's squelch. However, tightening the squelch could cause calls from members of your communications group that are farther away to be filtered out as well.
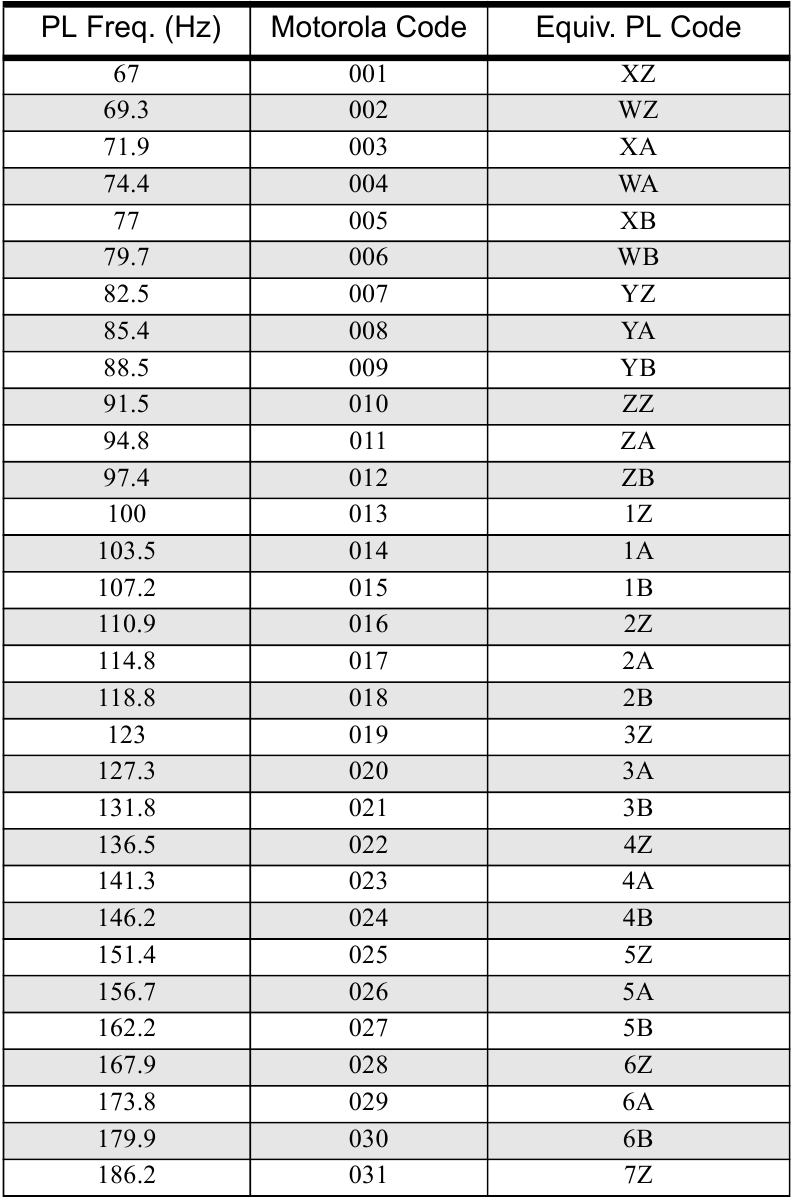
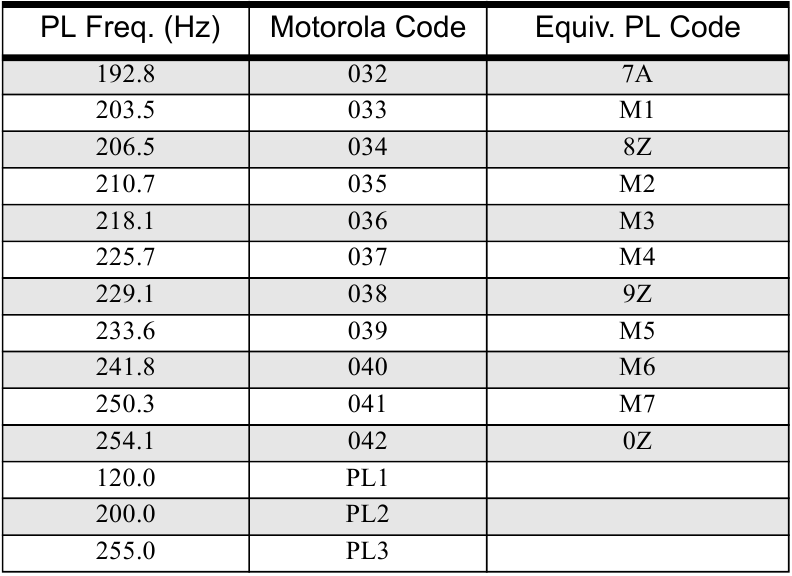
PL and DPL codes allow you to create several communication groups within a single channel. All radios on that channel with the same set of PL/DPL Receive and Transmit codes are able to communicate with each other. In most cases, other radios on that channel not set with any code, or are set with different codes will not participate in the communications.
NOTE: PL/DPL codes do not offer complete privacy, as any radio user can listen into the communications on that channel by pressing the Monitor button.
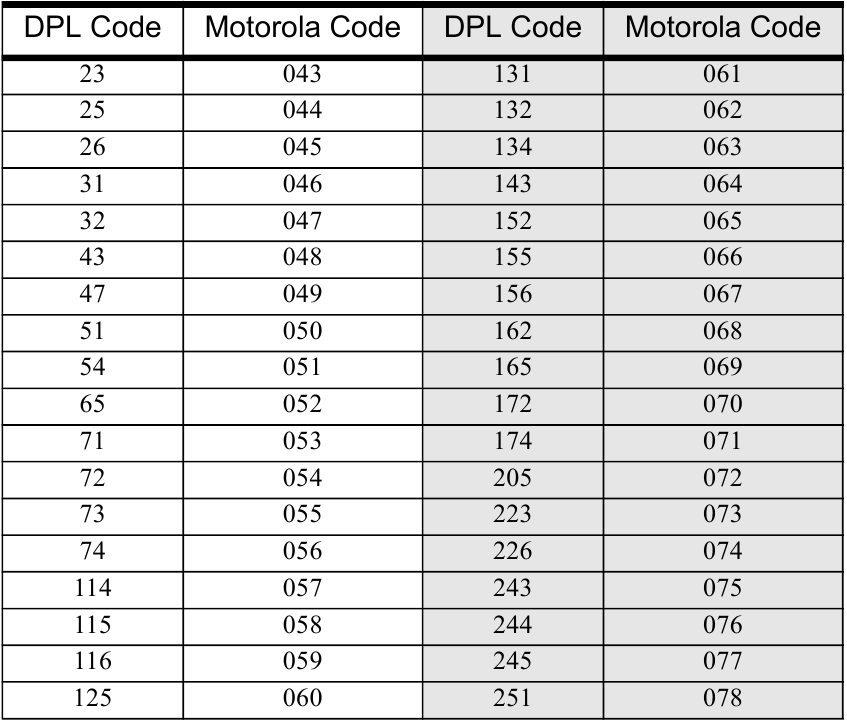
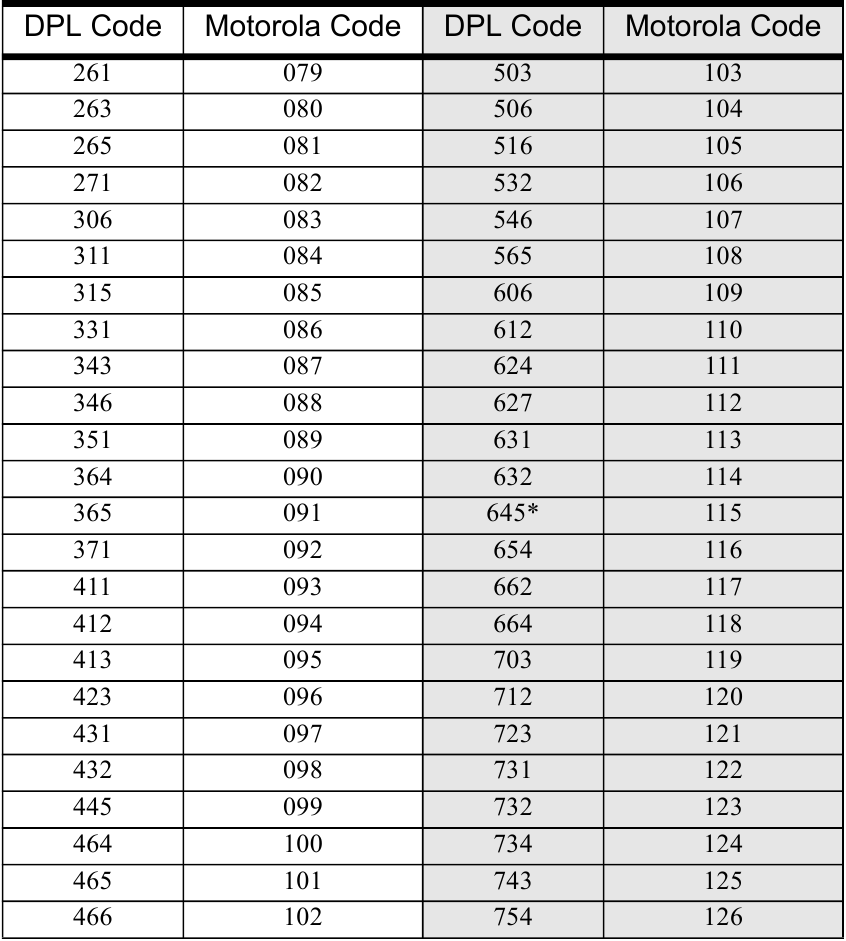
You have a choice of selecting 001, 002, . 042, PL1, PL2, PL3 for PL codes, and 043, 044, . 126 for DPL codes. Please refer to the "Accessing Programming Mode Parameters" section for details in setting the PL/DPL Receive and Transmit codes for your desired channels.
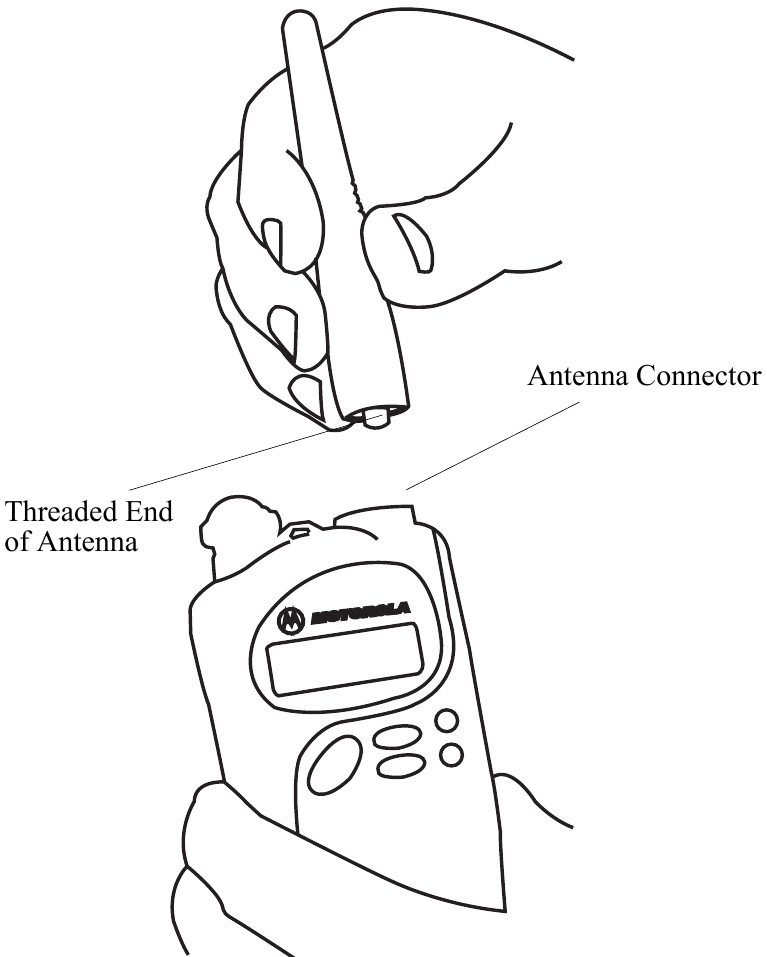
To Attach Antenna
To Remove Antenna
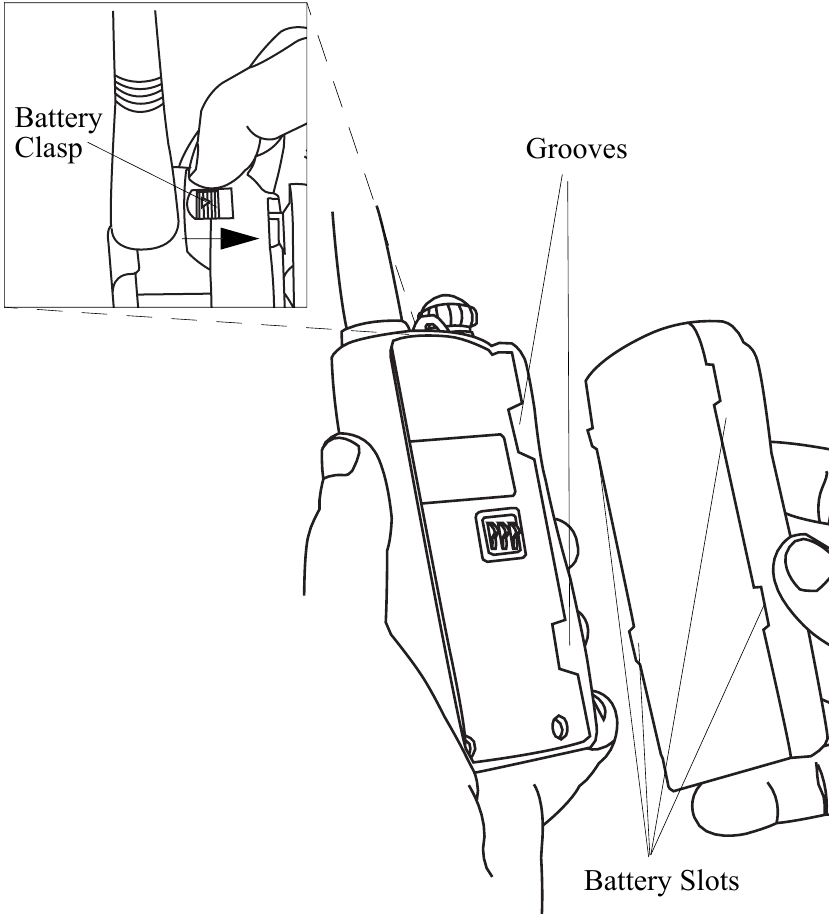
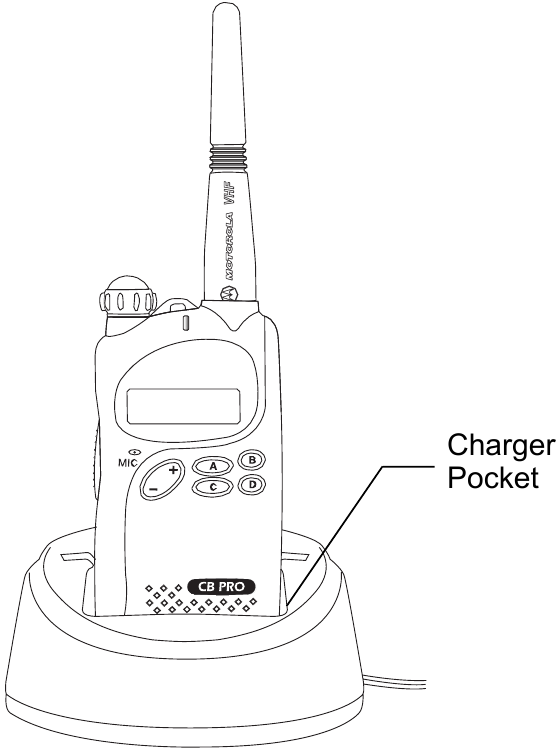
To Attach Battery
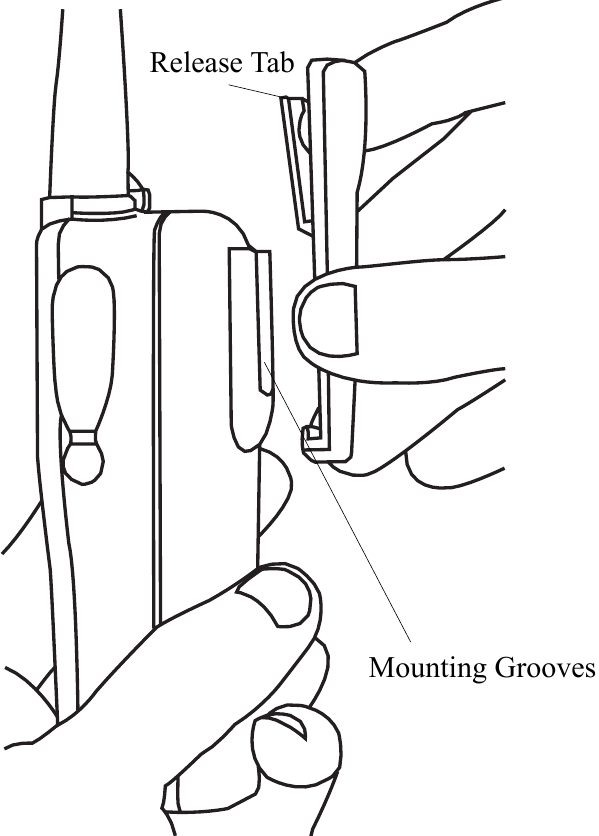
To Remove Belt Clip
To Attach Belt Clip
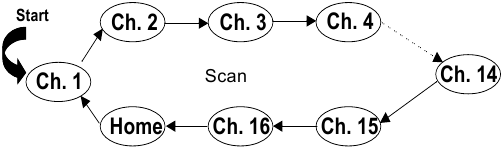
Scan allows you to monitor multiple channels and receive calls that are transmitted on them.

During scan, when activity is detected that meets the unsquelch condition, the radio stops scanning and switches to that channel; the indicator is illuminated, and the channel number is displayed. When no activity is detected for a pre-set time, the radio resumes scanning.
The radio transmits on the Home Channel (the channel, the radio was monitoring, before the user activated scanning), if PTT is pressed during scanning. If the radio has stopped scanning, and changed to a particular channel, all transmit and receive activities is performed on that channel.
A channel with unwanted activity is called a Nuisance Channel. You can remove a Nuisance Channel from the scan list temporarily. To remove a Nuisance Channel
You cannot remove the Home Channel from the scan list. If attempted, a low-pitched tone is heard, and no action is taken.
To reinstate the deleted channel(s) into the scan list, restart scan, or simply turn off your radio and turn it on again.
| Indicator | Battery Level |
 | Good |
 | Sufficient |
 | Low |
 | Very Low |
 (flashing) | Need to Recharge your battery |
| Ch. | Freq. (Hz) | Ch. | Freq. (Hz) | Ch. | Freq. (Hz) | Ch. | Freq. (Hz) | Ch. | Freq. (Hz) |
| 1 | 476.425 * | 9 | 476.625 | 17 | 476.825 | 25 | 477.025 | 33 | 477.225 |
| 2 | 476.450 * | 10 | 476.650 | 18 | 476.850 | 26 | 477.050 | 34 | 477.250 |
| 3 | 476.475 * | 11 | 476.675 | 19 | 476.875 | 27 | 477.075 | 35 | 477.275 † |
| 4 | 476.500 * | 12 | 476.700 | 20 | 476.900 | 28 | 477.100 | 36 | 477.300 |
| 5 | 476.525 *,† | 13 | 476.725 | 21 | 476.925 | 29 | 477.125 | 37 | 477.325 |
| 6 | 476.550 * | 14 | 476.750 | 22 | 476.950 ‡ | 30 | 477.150 | 38 | 477.350 |
| 7 | 476.575 * | 15 | 476.775 | 23 | 476.975 ‡ | 31 | 477.175 | 39 | 477.375 |
| 8 | 476.600 * | 16 | 476.800 | 24 | 477.000 | 32 | 477.200 | 40 | 477.400 |
*. Repeater Channels.
†. Frequencies dedicated for emergency use only.
‡. Receive only frequencies.
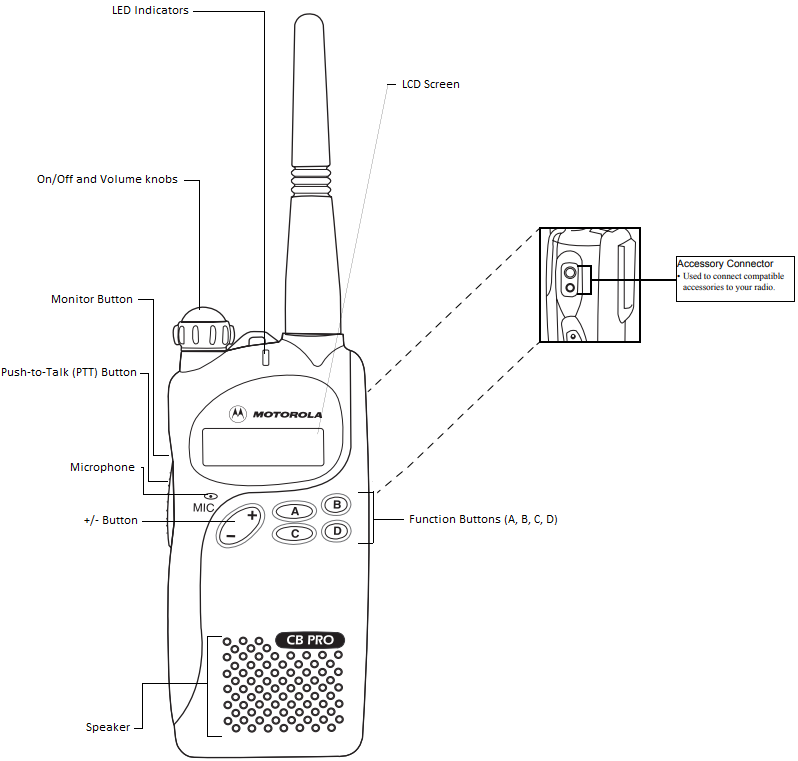
LED Indicators
| LED Colour | State | Indication |
| Red | Illuminated | Radio is transmitting. |
| Blinking | Battery voltage is low. | |
| Green | Illuminated | Radio is receiving. |
On/Off and Volume Knob
Monitor Button
Push-to-Talk (PTT) button
Microphone
+/- Button
LCD Screen
| LCD Indicator | Description | Function |
 | Keypad lock indicator | Illuminates when your keypad is locked. |
 | Battery level indicator | Shows remaining charge in battery based on how many bars are displayed (see "Battery Gauge Indicator Details"). |
 | Power level indicator | "L" illuminates to indicate radio transmits in low power; "H" illuminates to indicate radio transmits in high power; "E" illuminates to indicate radio is on economy low power. |
 | Monitor indicator | Illuminates when monitoring a selected channel. |
 | Programming Mode indicator | Illuminates when in Programming Mode. |
 | Scan indicator | Blinks when scan is activated. Illuminates when there is some activity on a channel. |
 | Signal Strength Indicator | Shows the signal strength. Six bars indicate the strongest signal. |
 | Talkaround Indicator | Shown when the user presses the Talkaround programmable button to enable Talkaround mode (user chooses NOT to use the repeater, but to enable pointto-point communications). Not shown when user presses the Talkaround programmable button again to disable Talkaround mode. |
Function Buttons (A, B, C, D)
| Button | Function |
| Backlight | Turns on the backlight display or toggles backlight display between On and Off, depending on programmed settings (see "Programming Mode"). |
| Keypad Lock * | Locks or unlocks all buttons except PTT, Monitor and On/Off/Volume Knob. |
| Nuisance Channel Delete | Removes unwanted channel(s) temporarily from scan list during scan. |
| Power Select * | Selects required power level: High, Low, or Economy Low. |
| Scan * | Starts or stops channel scan. |
| Squelch Level * | Selects desired squelch level. Use the +/- button to choose desired level (Level 0 will unsquelch radio unconditionally, whereas Level 15 will set tightest squelch). |
| No Operation | No function is programmed to this button. |
| Talkaround | Enables or disables radio to transmit in Talkaround mode. |
*. Parameter values are preserved, even after the radio is turned off.
| Press Type | Button A | Button B | Button C | Button D |
| Short Press | Scan | Squelch Level | Talkaround | Backlight |
| Long Press | Nuisance Channel Delete | Power Select | Keypad Lock | No Operation |
This mode allows you to change feature parameters to enhance the use of your radio.
If your radio is turned on, turn it off. Press and hold the Monitor button, and turn on your radio. A ringing tone is heard, indicating that your radio is in Programming Mode. The K indicator illuminates and RW is displayed.
Programming Mode parameters are grouped into two main categories: RW (Radio Wide) and Channel (CH 001 - CH 040). Use + or - to select RW or the desired channel:
RW CH 001 CH 002 . CH 040
Once you have made the appropriate selection, press PTT or the Monitor button to scroll through the features available. Press the +/- button to scroll through the parameters for each feature.
Features available Radio Wide (default settings shown in bold where applicable):
You can include up to 16 channels in the scan list. When scanning is activated, only these 16 channels are scanned. Press + or - to move from one scan list member to another. To include a channel into the scan list, first, use Button A to scroll in the ascending order, or Button C to scroll in the descending order to the required channel; then, press PTT to include this channel in the scan list.
To erase a channel from the scan list, press Button D.
Features available per Channel (default settings shown in bold):
| Feature | Range | Remarks |
| Channel Receive PL/DPL (RPL-XXXX) | 000, 001, . 126, PL1, PL2, PL3 | This is the PL or DPL code that the channel will use to unsquelch the receive message. 000 indicates that no PL/ DPL is used for receive, i.e., radio operates in carrier squelch mode. Press + or - to select the desired PL/DPL. |
| Channel Transmit PL/DPL (TPL-XXXX) | 000, 001, . 126, PL1, PL2, PL3 | This is the PL or DPL code that the channel will use to transmit the message. 000 indicates that no PL/DPL is used for transmit. Press + or - to select the desired PL/DPL. |
Turn off the radio to exit Programming Mode.
© 2002, 2003, 2004 by Motorola, Inc.
Motorola Technology Sdn. Bhd. (Co. No. 455657-H)
Plot 2, Bayan Lepas Technoplex Industrial Park,
Mukim 12, S.W.D.,11900 Penang, Malaysia
Printed in Malaysia. 12/04. All Rights Reserved.

Here you can download full pdf version of manual, it may contain additional safety instructions, warranty information, FCC rules, etc.
Do you have a question about the Alpha CB PRO that isn't answered in the manual? Leave your question here.
Thank you! Your question has been received!